Making flowcharts in Word is quite easy for some Windows users but not for others. Flowchart allows you insert shapes in a Word document and enables you to modify the document according to your preferences. If you are amongst the users who do not know how to make a flowchart in Word then you have come to the right place. In this article, you will find the step by step guide for making flowcharts in Microsoft Word documents in no time.
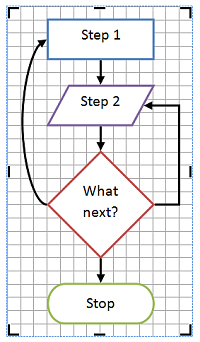
Here’s how to make a flowchart in Word
- Choose the folder.
- It is located in the Microsoft Word.
- You will find this where the canvas is situated.
- Click on the Insert option.
- Choose the Shapes option.
- Click on the New Drawing Canvas option for adding the drawing canvas to your Word document.
- Choose the drawing canvas.
- Choose the Shape Format option.
- Choose the Wrap Text option.
- Select how you want to show the text.
- Just take an example, select the Top and Bottom option to stop the text from showing towards the corners of the canvas.
- For changing the drawing canvas size, pull the corner for creating the size of the drawing.
- For adding the border, you need to choose the drawing canvas.
- Click on the Shape Format option.
- Choose the Shape Outline option.
- By going to the Color palette, select the outline color.
- Choose the Weight option for changing the thickness of the line.
- Choose the Dashes option for changing the type of line.
- After changing the drawing canvas as per your wish, you need to add the shapes now.
Here’s how to add shapes to your drawing canvas
- Click on the Insert option.
- Choose the Shapes option.
- Click on the Flowchart column.
- Choose the shape.
- Choose the Process shape.
- It is located at the starting of the flowchart.
- Choose the location on your drawing canvas.
- It will help you to choose the shape and insert it.
- Now, you will get the shape with the color and size of your drawing canvas.
- Start adding another shape for finishing the flowchart.
- In case you want to change the look of the shapes, then you can also change the size of it.
- Click on the Shape Format option for changing the color, outline color.
- After that, start applying the style of the shape.
- Otherwise, start applying the effect of the shape.
Here’s how to add text to your drawing canvas shape
- Click twice on the shape.
- Type the text which let you to know the job and also the purpose of this shape.
- Choose the drawing canvas shape while completing the typing.
- For formatting the shape, you need to choose the shape.
- Click on the Home option.
- Start changing the style, color, and the size of the font.
- If you want to add the same text in each shape, then you need to choose the drawing canvas space.
- After that, click on the Control and A keys together to choose the shapes.
- After that, start changing the text looks.
Here’s how to use SmartArt to make a flowchart in Word
Choose the SmartArt Graphic
- Slide the mouse cursor where you wish to add the SmartArt graphics.
- Click on the Insert option.
- By going to the Illustrations group, choose the SmartArt option.
- Choose the Process option.
- It is located in the Choose a SmartArt Graphic prompt box.
- This procedure will help you see the styles of the flowchart, which are available now.
- Select the style of the flowchart.
- After that, choose the OK button.
- Once you have completed this procedure, you can start using the SmartArt on your system.
Source :-
https://karenmintonblogexpert.wordpress.com/2019/08/30/how-to-make-a-flowchart-in-microsoft-word/
Kellie Minton is a qualified IT engineer by education. After working in the IT sector for a decade, she began writing about it two years ago. She loves to write about emerging technology like office.com/setup .