Thursday, August 29, 2019

How to Turn Off Bixby on Galaxy S10

Bixby comes as your assistant if you own a Samsung Galaxy S10. Bixby assists you on almost everything in operating of your phone. The feature recognizes more than hundred commands. From playing a specific music to turning off the device, Bixby obeys your every voice command. Besides this, several users do not prefer Bixby on their devices and do not know how to turn it off. If you are amongst  the users who is facing the same issue then you have come to the right place. Here is how you can turn off Bixby on your Samsung Galaxy S10 device.
galaxys10
The closest thing to turning off the Bixby Galaxy S10
  • Click on a space given on the home screen of the smartphone.
  • After making the home screen smaller, you need to move to the right-hand side.
  • It will display the small Bixby Home screen.
  • It is located in the middle of the screen.
  • Click on the slider to disable the Bixby Home screen.
Once you have turned off the Bixby Galaxy S10, you need to follow the steps mentioned below:
  • Click on the Settings tab.
  • Go to the Advanced Features tab.
  • Select the Bixby key.
  • By going to the Bixby key window, choose the Double press to open Bixby option.
  • After that, double-click on the option for opening Bixby.
Remapping the Bixby key
  • Open the Bixby key by clicking on the Bixby option.
  • Now, you will get the three vertical dots symbol.
  • It is located at the right-hand corner of the display.
  • Click on the three vertical dots symbol.
  • Select the Settings tab.
  • Choose the Bixby key.
  • Select in case you wish to launch the Bixby by clicking on the option at once.
  • Otherwise, double-click on it.
  • Start mapping the option for opening any other app after clicking on it.
  • Go to the “Use single or double press” option.
  • Turn on the feature by sliding the toggle to turn on.
  • Click on the “Open app” option.
  • You need to select which application you want to launch after clicking on the option.
Remapping the Bixby key by using quick commands
  • Open the Bixby Voice.
  • Click on the menu symbol.
  • Choose the Quick commands option.
  • Start using the plus symbol.
  • It is located in the upper right-hand side for creating the new command.
  • You need to give the title “Assistant.”
  • Change the command phrase to Assistant.
  • By going to the Enter command window, select the “Type a command” option.
  • Enter “open assistant” in the given bar.
  • In case this procedure will not work, then choose the “open Google assistant” option.
  • Start saving the command.
  • After that, go to the Settings tab.
  • Click on the Bixby key option.
  • Select the Bixby key option.
  • Select the Double press to open Bixby option.
  • Select the Quick Command option.
  • Click on the Assistant command by going to the Quick Commands options.
Using the Bixby key assistant remapper for accessing any other assistant
  • Start downloading the app.apk to the phone.
  • Go to the file.
  • Go through the steps for installing the application.
  • Click on the “Bixby Voice Settings tab.
  • Complete this procedure by clicking on the Bixby key.
  • Click on the settings tab.
  • Select the Bixby key option
  • In case you have chosen the “Use single press” option, then it will be available now.
  • By turning on the Use single press option, choose the Open app option.
  • Click on the gear symbol.
  • You have to choose the application which you wish to launch through the Bixby option.
  • Choose the Bixby Button Assistant Remapper option.
  • After clicking on the Bixby option.
  • Choose the one as per your wish.
  • Click on the Always option.
Kellie Minton  arrived on the cyber security scene in the early 2000s when virus and malware were still new and slowly evolving. Her longtime affair with writing with an interest in the cybersecurity industry, combined with her IT degree, has contributed to experience several aspects of security suite industry such as blogging at norton.com/setup  .
How To Make A Flowchart In Microsoft Word

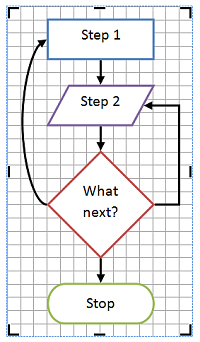
Making flowcharts in Word is quite easy for some Windows users but not for others. Flowchart allows you insert shapes in a Word document and enables you to modify the document according to your preferences. If you are amongst the users who do not know how to make a flowchart in Word then you have come to the right place. In this article, you will find the step by step guide for making flowcharts in Microsoft Word documents in no time.
flowchart
Here’s how to make a flowchart in Word
 
  • Choose the folder.
  • It is located in the Microsoft Word.
  • You will find this where the canvas is situated.
  • Click on the Insert option.
  • Choose the Shapes option.
  • Click on the New Drawing Canvas option for adding the drawing canvas to your Word document.
  • Choose the drawing canvas.
  • Choose the Shape Format option.
  • Choose the Wrap Text option.
  • Select how you want to show the text.
  • Just take an example, select the Top and Bottom option to stop the text from showing towards the corners of the canvas.
  • For changing the drawing canvas size, pull the corner for creating the size of the drawing.
  • For adding the border, you need to choose the drawing canvas.
  • Click on the Shape Format option.
  • Choose the Shape Outline option.
  • By going to the Color palette, select the outline color.
  • Choose the Weight option for changing the thickness of the line.
  • Choose the Dashes option for changing the type of line.
  • After changing the drawing canvas as per your wish, you need to add the shapes now.
 
Here’s how to add shapes to your drawing canvas
 
  • Click on the Insert option.
  • Choose the Shapes option.
  • Click on the Flowchart column.
  • Choose the shape.
  • Choose the Process shape.
  • It is located at the starting of the flowchart.
  • Choose the location on your drawing canvas.
  • It will help you to choose the shape and insert it.
  • Now, you will get the shape with the color and size of your drawing canvas.
  • Start adding another shape for finishing the flowchart.
  • In case you want to change the look of the shapes, then you can also change the size of it.
  • Click on the Shape Format option for changing the color, outline color.
  • After that, start applying the style of the shape.
  • Otherwise, start applying the effect of the shape.
 
Here’s how to add text to your drawing canvas shape
 
  • Click twice on the shape.
  • Type the text which let you to know the job and also the purpose of this shape.
  • Choose the drawing canvas shape while completing the typing.
  • For formatting the shape, you need to choose the shape.
  • Click on the Home option.
  • Start changing the style, color, and the size of the font.
  • If you want to add the same text in each shape, then you need to choose the drawing canvas space.
  • After that, click on the Control and A keys together to choose the shapes.
  • After that, start changing the text looks.
 
Here’s how to use SmartArt to make a flowchart in Word
 
       Choose the SmartArt Graphic
 
  • Slide the mouse cursor where you wish to add the SmartArt graphics.
  • Click on the Insert option.
  • By going to the Illustrations group, choose the SmartArt option.
  • Choose the Process option.
  • It is located in the Choose a SmartArt Graphic prompt box.
  • This procedure will help you see the styles of the flowchart, which are available now.
  • Select the style of the flowchart.
  • After that, choose the OK button.
  • Once you have completed this procedure, you can start using the SmartArt on your system.


Kellie Minton is a qualified IT engineer by education. After working in the IT sector for a decade, she began writing about it two years ago. She loves to write about emerging technology like office.com/setup .

How to Transfer Music from a Computer to Your iPhone

If you want to know how to transfer music from a PC to an iOS device, then you have come to the right place. Let’s see how the process goes.
 
Setting Up Your Device to Transfer the Music
Before you start the transfer process first, you need to set up your device and tweak some settings on your device. We are using the manual method for transferring the music into an iPhone. In the manual method, you will be able to transfer the selective tracks of your choice to your iPhone. In the automatic method, you can’t choose what you want to transfer, and the system will automatically sync all tracks between both devices.
In order to do a successful music transfer between your devices, iTunes app should be up to date in your both PC and iPhone.
That is the reason we have chosen the manual method in priority. Let’s see what we need to set up before transferring the music:
  1. On your computer, open the iTunes app and then navigate to the “Summary” option appeared on the left side panel.
  2. You will see a checkbox beside to “Manually manage music” click on it to checkmark it. This will enable the manual music transfer in your device.
  3. Finally, you have to hit the Apply button to save your preferences.
Now your PC is ready to copy music to your iPhone.
 
How to Transfer Songs from Computer to iPhone?
With the help of this method, you will be able to copy selected tracks and songs according to your preference. It means that you can skip the songs which you don’t want to transfer into your iOS device.
  1. Plugin the USB cable into both devices. First, plug it into the phone or tablet and then into your PC.
  2. Open iTunes on your PC.
  3. After that, click on the phone icon located on the top-left side.
  4. Now on the left side of the iTunes app, find the “Library” section. Go to Songs, and select the songs and albums which you want to transfer into your iPhone (To select multiple songs, hold the Ctrl key on the keyboard and then click on the songs one by one).
  5. Now drag selected songs into the iPhone located at the top-left. Once you have dragged the songs into the iPhone icon, your songs will be transferred to your phone instantly.
Kellie Minton  arrived on the cyber security scene in the early 2000s when virus and malware were still new and slowly evolving. Her longtime affair with writing with an interest in the cybersecurity industry, combined with her IT degree, has contributed to experience several aspects of security suite industry such as blogging at norton.com/setup  .

Wednesday, August 28, 2019

How to Use Microsoft Photos in Windows 10?

Luckily, Microsoft Photos application is entirely free of cost for the users of Windows 10. This powerful application can be used for plenty of reasons such as for viewing, editing, and so on. To know about it in more detail, go through this blog carefully.

windows 10
Note: This blog is applicable to the users of Microsoft Photos application on Windows 10.
How to access Microsoft Photos app?
  1. Firstly, press on ‘Start.’
  2. Then, choose Photos into the search bar and select the Photos application.
The method of adding pictures to the application
  1. Firstly, connect the pen-drive or memory card to your PC .
  2. Then, choose the Start option.
  3. After that, select Photos.
  4. Next, choose import.
  5. Then, go through the instructions given on display for importing the photos to the Photos application.
The method of making videos in the Windows 10 Photos Application
  1. Firstly, go to Microsoft Photos and choose the picture that you wish to edit. Keep in mind that this picture shall open in the application.
  2. Choose the Edit and Create pull-down menu. It shall be towards the right-hand side.
  3. Then, choose Edit under the Edit and Create pull-down menu for cropping the picture, adding filters, effects, and much more.
  4. After that, observe that the editing section shall be opening with three tabs. Whenever you choose a tab, more options will get displayed. Choose the option for previewing it and select save for adding the changes.
  5. Choose Draw under the Edit and Create pull-down menu for putting an artistic effect to the picture of yours. This window comprises of four options. Every option has more options included on it. After you are done with the selection, you can easily start writing or drawing on the picture. Select Save or save a copy for saving the modifications.
  6. Next, put 3D Effects from the ‘Edit and Create’ pull-down menu for including 3D pictures that can also be animated. For instance, water droplets in the image of yours. Choose an option from the Effects tab for putting it to the image that has been selected by you. With the help of handles, the rotation of the picture can be done and you can also make a stunning animation by moving the animate handle towards the end of the image. Choose Save a Copy for applying the modifications.
Photos is an amazing app for viewing and editing pictures in Windows 10 devices.
Kellie Minton is an avid technical blogger, a magazine contributor, a publisher of guides at mcafee.com/activate and a professional cyber security analyst. Through her writing, she aims to educate people about the dangers and threats lurking in the digital world  .

How To Use Google To Locate Your Lost Android Phone

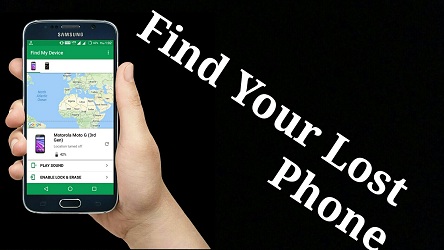
If by chance you lose your Android phone, then do not panic. After all, Google’s ‘Find My Device’ feature allows you to know the location of your phone. You can even lock your phone immediately or can clear it thoroughly so that none of your private information gets compromised.
find your lost phone
The method of setting up Google Find My Device
It is worth noting that the location of the device is not needed for locking or erasing it remotely.
  1. Firstly, switch on your device.
  2. Then, slide upwards so that you can get the Quick settings.
  3. After that, ensure that the internet connection is working and turned on.
  4. Next, move to Settings.
  5. After that, press on Google.
  6. Then, press on Google Account.
Remember! The name and Gmail ID of yours shall be given on display. It shall be towards the top of the page if you are signed in. Or else a notification shall be provided on the screen, if you have to log in.
  1. Next, press ‘Security and location.’
Remember! In some of the gadgets, you require to visit Google and press on Security.
  1. Then, below Find My Device shall be stating On or Off. if it might be off, you need to press on Find My Device and push the button for turning it on.
  2. Next, visit ‘Security and location’.
  3. After that, move down to the Privacy part.
  4. Note that below the Location, it shall be stating On or Off. If that is off, then press Location and push the button to turn it on.
Remember! Your smartphone can be seen on Google Play. However, you can still hide it.
  1. Then, for checking the status of your gadget on Google Play, visit play.google.com/settings. Note that on your same particular page you will be able to view all of your devices.
  2. Next, below Visibility press Show in menus.
The method of using Google Find My Device
  1. Firstly, open your web browser tab.
  2. After that, visit google.com/android/find and sign in to the Google account of yours.
  3. Observe that if your location services are enabled, Find My Device shall show the location of it.
  4. As soon as your Find My Device is turned on and working, you need to do any of the one from the following three options:
  • Play Sound: Your phone will start beeping.
  • Secure Device: It will lock the device.
  • Erase Device: It will remove all the data.
Kellie Minton  arrived on the cyber security scene in the early 2000s when virus and malware were still new and slowly evolving. Her longtime affair with writing with an interest in the cybersecurity industry, combined with her IT degree, has contributed to experience several aspects of security suite industry such as blogging at norton.com/setup  .
Tuesday, August 27, 2019

How to Transfer Candy Crush Progress to Your New Device

Smartphones are not only used for making or receiving calls but often used for playing video games. One of the most played games on the smartphone is Candy Crush. This game can be played anywhere no matter if you are traveling, working, or chilling. Candy Crush is a highly addictive game. But what if you have bought a new phone? Is your all progress going to go down the drain? Not really, it is quite easy to move your Candy Crush progress to a new device, whether it is Android or iOS.
candy crush
There are several ways to send your current game profile to a new device. Let’s get started.

Using Facebook and King.Com
This is one of the most common ways to move the progress of your Candy Crush game, and it is also suggested by the official Candy Crush team to use Facebook or king.com.
So in order to forward your game’s progress to a new device, you need to create an account on king.com or a Candy Crush account on your Facebook profile. By using these both platforms, you will be able to transfer the game progress. No need to install any third-party software or app on your device. Let’s begin.
  1. Open your Candy Crush game.
  2. Now backup your game progress and then link to your Facebook or Kingdom(king.com) account.
  3. By doing so, your Candy Crush progress will be transferred to your FB or Kingdom account. You will be able to restore your progress on a new device.
  4. On your new device, install Candy Crush either from Google Play Store or Apple App Store.
  5. Run Candy Crush on your brand new device.
  6. Link to your Facebook or Kingdom account.
After a while, your game progress and profile will be automatically restored. And you will be able to continue the game where you left it last time. Don’t expect to get your extra moves, booster, and extra lives on your new phone.

How to Move the Progress of Candy Crush to a New Device Using Third-Party Apps
If you are unable to do it via Facebook or king.com, then there are plenty of other ways to do that. Below is another method which can help you to transfer your game progress.

Using Helium App
Helium is a third-party app created by ClockworkMod, which is only supported in Android devices. So if you own an Android phone, then go for it. This app can be used to move the progress of your game to another device. To use this app, you need a desktop and Android device.

First, install this app on your Android phone and PC. After that, open the app on your old mobile. Insert USB cable to your old phone and PC. Go to the Helium app on your computer, and then your phone app will be linked to your PC. You will also see a message on your desktop display saying that the Helium app is activated on your phone after that, follow the on-screen instructions to complete the process.

Hopefully, this article helped you to transfer your Candy Crush progress to a new phone.
Kellie Minton is an avid technical blogger, a magazine contributor, a publisher of guides at mcafee.com/activate and a professional cyber security analyst. Through her writing, she aims to educate people about the dangers and threats lurking in the digital world  .

Monday, August 26, 2019

How to Fix ATKEX_cmd.exe Has Stopped Working

Many users are reporting that they are continuously getting the ATKEX_cmd.exe has stopped working error on their computer. Other users are complaining that they are facing this error while trying the demand app, such as rendering a video or playing any game. If you are one of them, then follow the instructions mentioned below to fix this issue.
Here’s how to fix ATKEX_cmd.exe has stopped working
 
  • Install the Intel Management Engine Driver
  1. You need to start downloading the IME updated version by pressing on the Install and Setup option.
  2. After that, by going to the Drivers and Download column, press on the Intel Management Engine Driver for Windows 8.1 and Windows 10.
  3. Press on the download option.
  4. It is located in the upper left-hand column of the display.
  5. After completing the downloading process, remove the zip archive.
  6. Press on the executable installation file.
  7. Go through the instructions to finish the IME installation file.
  8. Start the system again.
  9. Check whether the ATKEX_cmd.exe has stopped working issue is fixed or not.
 
  • Make sure that the audio driver is turned on
  1. Click on the Windows and R keys together.
  2. It will launch the Run prompt box.
  3. Enter the “devmgmt.msc” in the search bar.
  4. Click on the Enter option.
  5. It will launch the Device Manager option.
  6. After going in the Device Manager option, you need to enlarge the pull-down list registered with the Audio inputs and outputs option.
  7. After that, you need to right-click on the audio driver.
  8. Select the Enable Device option.
  9. It is located on the prompt box.
  10. You need to right-click on an audio driver once again.
  11. Select the Uninstall device option.
  12. After that, press on the Uninstall again to verify the uninstallation procedure.
  13. After completing the procedure, start the system again to permit Windows for installing the audio driver.
  • Uninstall the Realtek audio drivers
  1. Click on the Windows and R keys together.
  2. It will launch the Run prompt box.
  3. Enter “appwiz.cpl” in the search bar.
  4. After that, click on the Enter option.
  5. It will launch the Programs and Features display.
  6. After going in the Programs and Features menu, go down to the menu list of all the apps which you have already installed.
  7. Find the Realtek HD Manager option.
  8. After getting the driver, you need to right-click on the driver.
  9. After that, go through the instructions to finish the Realtek driver audio uninstallation procedure.
  10. Start the system.
Source :-
Kellie Minton is an avid technical blogger, a magazine contributor, a publisher of guides at mcafee.com/activate and a professional cyber security analyst. Through her writing, she aims to educate people about the dangers and threats lurking in the digital world .

McAfee Vs. Kaspersky Internet Security

  McAfee and Kaspersky are well-known names in the antivirus circle. It’s not wrong to say that they can be considered giants in the online ...